You are a computer user, at some point you must have system slag slowness or even the computer becoming hot. Yes, the experience is very awful and it leave you worried and frustrated, you are trying to work on something that is very important. You don’t have to be worried, since the time is a result of unusual behavior of the WMI Provider. Host service not being able to follow a pattern, it is supposed.
What is a WMI Host Provider and how to fix it? Probably this is the question that you are asking yourself, you come across this term. You are wondering the term in the right place.
What is WMI Provider Host
The term is simply an acronym for Windows Management Instrumentation Provider Service. The tool was designed by the Microsoft team and it is a very vital tool, it comes to accuracy in the functionality of the Windows Operating System.
The tool aids in process of requesting information, that is initiated by other applications in your computer and it mostly runs in the background. Under normal circumstances, the process is not supposed to utilize a lot of your computer resources, but it not a case for every Windows computer user, some come across high disk usage error. The process utilizes a lot of CPU resources provided, there is another process in your computer system which is misbehaving.
In other words, the tool is just a standard way for an application or even an administrative script to access information on the state of your Windows Operating System or the data that is in it by simply requesting.
The tool, therefore, makes the information available upon every request made by a program. For example, software and computer commands can be used to access the information on the state of BitLocker drive encryption, so the tool kicks in to provide it, which one is given the ability to access the entries which are in the event logs or even can be given access on information concerning an installed application that may even include the WMI Provider.
The tool is very essential especially for organizations, that manage their Computer, centrally the requested scripts can be displayed on administrative consoles. Other than being a module that can provide communication for data, the tool is very important, it comes to finding a variety of vital pieces of information that is normally not displayed or exposed on the windows interface of your computer.
The tool can also prove to useful for Developers for monitoring purpose. For example, the WMI Command line tool (WMIIC) can be useful, you need to know your computer’s Serial Number, motherboards’ model number or even to see the SMART health status of your computer’s hard drive.
Why is the WMI Provider Host Utilizing a large number of CPU Resources?
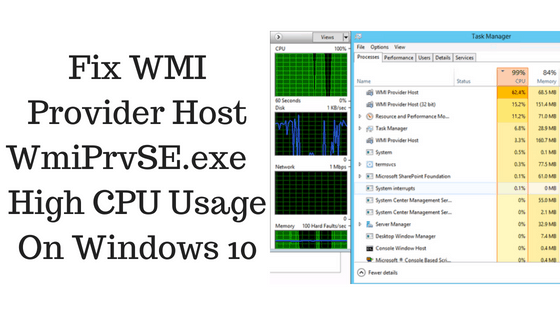
Under normal circumstances of operations, the WMI Provider Host should only consume 1% to 2% of your CPU resources, a program sends a request for information to be made available. There should not be any problems arising with this standard rate of utilization. However, it’s very noticeable, something is not right, the WMI Provider Host puts a significant amount of load on the CPU, which comes as a result of high memory usage.
Some of the issues that you may experience, it happens include:
- Programs become unresponsive.
- The CPU’s Temperature increase.
- Your computer become slow.
- Your experience slag and slowness on a computer program.
How to Fix WMI Provider Host
You have come across the issues or problems above, there is a chance that you are probably wondering on how to fix them, but there is no need, there are several method or ways to fix these issue that come as a result of high usage of the CPU’s resources. You can use the following ways to fix the problem.
Restart Your Personal Computer
You face a problem with your Personal computer, you are advised to restart your Personal Computer. There are many benefits, that restart your computer.
A computer reboot flushes the Random Access Memory, (RAM) which is the main type of memory for your computer. The ram is responsible for short term tasks and data, therefore, it is flushed out, it does away with data which is random, temporary and not important, which may be the reason, why you are experiencing problems in your device. Rebooting your computer may be an efficient way to achieve a good performance of your device, the Random Access Memory will be flushed.
The rebooting process has proved to be a process, that saves time, it comes to fixing errors. It is also important to note that Computers, to take a very long period of time without reboots, become prone to bugs and glitches and restarting your computer. A suitable way to recharge your computer’s memory and keep them free from overloads.
Restarting your computer is a simple method, also the Windows Operating System a recharge and ability to restore service, that have been compromised by an application, hence anything can be causing WMI Provider Host to follow a pattern, it is not supposed to follow the resolved in the process. This process works mostly for about 99% of users, it gone through these problems. However, it may not work for everyone, therefore other methods can be tried.
Ways to restart your PC
There are many ways to you can use restart your computer. Below the methods for you.
Way 1: On all Windows version, you can restart your computer, in the Desktop and press a combination of keys (Alt + F4) to display a menu. Click on the down arrow to display a list and select Restart and finish by clicking Ok to start the process.
Way 2: On the lower-left corner of your computer screen lies the Start. Click on the feature and proceed by clicking on the Power option. After that, a menu is displayed, hence click the Restart option to start the process.
Way 3: Another way to restart your PC is by simultaneously pressing the (ctrl + alt + delete) Keys on your keyboard. An administrative menu is displayed to proceed by locating the Power Icon and clicking it to select the restart option.
Way 4: You can also use the Command Line to restart your computer. Simply click on Start and open the Command prompt as an admin. Then type ‘shutdown /r’ on the tool to start the process.
Restart the Windows Provider Host Service
To restart the Windows Management Instrumentation Services Simply Hold the Windows key in your keyboard and press the R Button. The Run dialogue box open, key in “services.msc’ and wait for the services console window to display.
Proceed by locating the Windows Management Instrumentation Service from the services console or you can press the W button on your keyboard to get to all the services, that have a name starting with the letter ‘W’. After locating the service, take a cursor on it and right-click to choose the restart option to begin the process.
Alternatively, press the (Ctrl + Alt + Delete) Keys on your keyboard. An administrative menu is displayed to proceed by locating the Task manager option and clicking it, to open the Task Manager menu or you can use the shortest method to access the Task Manager, where by you just have to perform a key combination from your keyboard (Ctrl + Shift + Esc).
Continue by clicking on Open Services, which is located on the footer of the tool to access the services console window. Finish by locating the Windows Management Instrumentation Service from the services console or you can press the W button on your keyboard to get to all the services, that have a name starting with the letter ‘W’. After locating the service, take a cursor on it and right-click to choose the restart option to begin the process.
This process should solve the WMI Provider Host high usage of CPU resources for a large number of users. However, if the process could not help you with the issues, it definitely means that you have to employ another method or tactic.

Repair or Rebuild the Windows Management Instrument
The method is very efficient in case the problem to being cause by this service. You might experience the high memory usage problem, there is a corrupt file in the WMI Provider Host file. This process aims to repair or rebuild the Windows management Instrument file.
To repair the file, simply click on the Start button and type Run in the search box, as you press the Enter button to access the Run dialogue box. Alternatively, you can use the (Windows key + X) to find the Run option and click on it to open the dialogue box.
The dialogue box is displayed the following command ‘Winmgmt/salvagerepository%windir%System32wbem’ and the Enter button to proceed. Sometimes you may not get any feedback or response. When this happens, simply try the following command ‘Winmgmt/resetrepository%windir%System32wbem’. Finally, restart your computer.
The following steps should be able to reset the WMI state to its original or initial file hence solving the high memory usage error that can be caused by corrupt WMI files.
Repairing corrupt files
Apart from the Windows Management Instrumentation files, there might be other program files causing error to your system. You can find and repair the files using the following way.
Simply, search for the Command prompt tool and run it in an administrator. After the tool opens, key in the following commands ‘SFC/scannow’ followed by a press of the Enter button and wait for a moment for the scan process to complete.
The scan process is complete, still in the command prompt key in ‘DISM/Online/Cleanup-Image/RestoreHealth’ so you can get a detailed report of the corrupted files in your system. After confirming that your system has corrupted files, the next step is to remove the errors immediately.
You may need to download a utility program to remove the error, such as the Reimage Plus. Download and run the program to fix the corrupted files by either repairing them or restoring the missing files.
Restart Other Associated Services
Simply, click on Start and open the Command prompt as an admin. Alternatively, you can access the command prompt, you can press the (Windows key + R) keys on your keyboard and type command and proceed by pressing the (Ctrl + Shift + Enter) keys simultaneously.
You should also note that, you are running on the latest version of Windows, you may need to type cmd.exe on your computer’s search bar and right-click on the Command prompt tool as you select the Run as administrator option. Then type the following commands on the tool and hit the Enter button after writing each command to start the process.
After the command, restart your computer and check the problem is fixed. The above command should allow the process to drop a significant amount of CPU resources, being used and bring it back to its normal functionality. The method doesn’t work for your computer, there is no need to worry, there are other methods that will be covered for you to try.
Run an Antivirus or a Cleaner Scan Program
An antivirus can hinder some applications from doing their work, to creating a functionality problem for the computer system. Even the misc files are also capable of causing problems to a computer system.
The WMI Provider Host is performing its functions, it may encounter applications to have files and data has been cached or some even be temporary files, which ends up interfering with the crucial computer system component. This problem can be solved by getting a reliable antivirus and installing a scan or clean a program to fix the problem, it makes easy for you to perform an action on your computer.
Perform a Clean Boot in Order to identify a faulty application
A particular or specific program can cause a high usage of CPU resources by WMI Provider Host. This is the case, performing a Clean boot can be a perfect method in solving the problem. You should note that, in a clean boot, only service the essence, performing the booting process are loaded, the rest are disabled.
The following procedure can be used to perform the clean boot process.
Begin by clicking on the Start button and type Run in the search box, as you press the Enter button to access the Run dialogue box. Alternatively, you can use the (Windows key + X) to find the Run option and click on it to open the dialogue box.
The dialogue box is displayed, move the cursor and place it in the box and key in ‘MSConfig’ and click OK or press the Enter button from your keyboard. Proceed by clicking on the Services tab and click the uncheck button for ‘Hide all Microsoft services.
The next move is to click on the Disable all option and press the Enter button on your keyboard or you may decide to click OK. Proceed by clicking on the Startup tab and clicking on the Open Task Manager option to display the Task Manager.
Once the Task Manager panel has displayed, click on the Startup tab and check on the status of the applications or programs. Continue by clicking on all of the options, that are enabled and disable them. When the applications or programs have been disabled restart your computer.
After your computer powers on, try and check if you can still experience the problem. If the WMI Provider Host high usage of CPU resources is no longer an issue then it probably means that a third-party program or service was causing the problem.
Lastly, go back to the task manager and start enabling the services. For effectiveness, enable the services one at a time, so that you can keep tabs with the CPU usage and when you notice that the high CPU usage is back, then it’s high time to disable or Uninstall the program you just enabled.
Locating the Process with the aid of the Event Viewer and Uninstalling it
Begin by pressing the (Windows key + X) keys on your keyboard to initiate the WinX Menu. Continue by select ting the Event Viewer in the WinX Menu. Alternatively, you can open the run dialogue box and type eventvwr and press okay to launch the tool. After the Event viewer panel is opened, click on the View tab and enable the Show Analytic and Debug Logs option. Proceed by clicking on the Applications and Services Logs option which is located on the left of the Event viewer panel.
Move the cursor to Microsoft and double click on it followed by a selection of Windows. Proceed by clicking on WMI activity and click on Operational log. After that take note of the items listed as Error and double click to open the specifications. There is also a good chance that you will see many or several errors here. The errors may result from the same ProcessID number or they might result from different Process IDs.
When you open the specifications, under the General tab find the ClientProcessId and take note of the numbers. Simultaneously press the (Ctrl + Alt + Delete) Keys on your keyboard. An administrative menu is displayed, hence proceed by locating the Task manager option and clicking it to open the Task Manager menu. Alternatively, you can use the (Windows key + X) keys on your keyboard to initiate the WinX Menu. Continue by selecting the Task Manager in the WinX Menu.
Finally, when you have the Task Manager panel, click on the Services tab and scroll up and down to find the service that matches the ClientProcessId the one you noted and decide if you would like to disable it or uninstall it.
Updating drivers of the components causing the problem
After completing finding the processes that may be causing the errors, you can try updating the drivers of the component. An error like this can be cause by faulty software and hardware drivers. It is not that common but it is worth giving it a shot. There are two ways in which you can use to achieve this:
Updating drivers manually
To update drivers manually is simply done by accessing the manufacturers’ official website of the component and searching for the latest version of it and selecting the version that is suitable for your computer system.
Updating drivers automatically
Sometimes you may find it to be a tiresome ordeal if you have to manually update drivers, therefore when time is of the essence you may opt for something that works well with patience and computer skills.
You can use the Driver Easy utility to install the latest versions of your computer programs or components. The Driver Easy utility has the ability to recognize your computer system and recommend for you the latest versions of your components or programs where you can download and install them accordingly.
All you need is to download and install the Driver Easy utility program and run a scan or click Scan Now. If there are driver related issues, they will be reported by the tool. Proceed by clicking Update all so that you can begin the automatic process of downloading and installing the drivers that might be missing in your computer or even drivers that are out of date.
You may need the PRO version to do this process but you don’t have to worry since the utility has a thirty-day money-back guarantee just in case the computer user is not satisfied with its operations, therefore, you could easily ask for a refund. The tool also has the ability to provide you with a manual option where it flags the programs that need updating or the missing drivers in your computer and leaves you to decide which driver you need to download and install.
Booting into Safe Mode with Networking
Performing a computer troubleshoot in a safe Mode is one of the ways that adequately assist in isolating and identifying computer-related problems.
Begin by clicking on the Start button and type Run in the search box as you press the Enter button to access the Run dialogue box. Alternatively, you can use the (Windows key + X) keys to find the Run option and click on it to open the dialogue box. Additionally, there’s a shorter method to open the Run dialogue box. Simultaneously click on the (Windows key + R) keys on your keyboard.
The dialogue box is displayed, move the cursor and place it in the box and key in ‘MSConfig’ and click OK or press the Enter button from your keyboard. Proceed by clicking on the Boot tab and click to tick on the ‘Safe boot’ button and click Apply and OK for changes to be effective. It is recommended that one saves their files and data before they proceed in clicking the Restart option to enter into Safe Mode.
When your computer is finally in the safe mode, simultaneously press the (Windows key + X) keys to initiate the WinX Menu then select the Windows PowerShell (Admin) option from the menu and when the selected tool opens, proceed by typing or keying in the following commands ‘msdt.exe -id MaintenanceDiagnostic’ and press the Enter button. After that, a troubleshooting window is displayed and continues the process by clicking Next.
When you reach this point, the troubleshooter detects some of the problems and gives detailed instructions on how to solve the problem. Go back to the PowerShell Window and typing or keying in the following commands ‘msdt.exe -id PerformanceDiagnostic’ and press the Enter button. After that, a troubleshooting window is displayed and continues the process by clicking Next. You may end up getting a notification that something in your system needs to be changed hence follow the instructions given to fix the problem.
After the process of troubleshooting is done, you have to go back or boot to the normal mode. I know you are probably wondering how to do this but is not a rocket science thing. Simultaneously click on the (Windows key + R) keys on your keyboard to initiate the Run dialog box and when it opens to move the cursor and place it in the box and key in ‘msconfig’ and click OK or press the Enter button from your keyboard. Proceed by clicking on the Boot tab and click to untick or uncheck on the ‘Safe boot’ button and click Apply and OK for changes to be effective and finish the process by restarting your computer to enter into Normal Mode.
Running the System Maintenance Troubleshooter
Many of the problems can be solved using this built-in feature, therefore it’s worth trying. This feature can be accessed by following procedure.
Simultaneously press the (Windows Key + R) on your keyboard to initiate the Run dialog box and when it opens to move the cursor and place it in the box and key in ‘control’ and click OK or press the Enter button from you keyboard to open the Control Panel. Proceed by searching for troubleshoot int the search box and click on Troubleshooting. The next step will be clicking on View all, it is located in the left of the pane.
After clicking on view all continue by clicking on System Maintenance so that you are able to run the Troubleshooter for System Maintenance to fix the WMI Provider Host high usage of CPU resources.
Conclusion:
A user may also think about disabling the WMI service instead of going through all these methods. Technically, it is a process that can be done, however, when you think its main purpose; providing information, you will understand that it is not a good idea to disable it.
The WMI Provider Host is a very fundamental and critical system feature. A system component is causing the high CPU usage errors or misbehaving, you already have information that is proven to be useful in fixing the problem.
Before performing any of the methods above always remember to save you files and data. It is also recommended for you to create a restore point so that when something goes wrong, you will always have a restore point to refer it.


")